Flashy
All-In-One flash, reboot, monitor and file management utility for Raspberry Pi bare metal.
Flashy lets you...
- upload and run kernel images
- send magic reboot strings
- monitor serial port output
- manage files on the SD card
- run an interactive shell to work with files on the SD card
- transfer files between host computer and SD card
- chain boot to other kernel images
... all via a simple serial port connection.
Version 1
Flashy v1 was based on David Welch's original bootloader program but added support for:
- Binary mode transfers (faster than sending .hex file as text)
- Sending magic reboot strings
- Serial port monitoring after flashing
- Delayed image starts (by timeout, or by command)
Flashy v1 can be found in the Circle repository.
Version 2
Flashy v2 is a complete re-write. The entire project has been cleaned up, refactored and re-engineered with a focus on robustness.
While Flashy v1 could provide very fast flash times it often suffered from reliability and recovery issues. It typically just saturated the serial port write buffer and hoped the device could keep up.
This version moves to a strongly encoded packet format with 32-bit checksums and ack messages for all host to device transmissions. It also offers several other improvements and new features:
- Dynamic baud-rate switching saves updating kernel image on device to switch baud rate
- Activity LED indicator shows ready status feedback
- Includes packaged pre-compiled bootloader images
- Supports sending
.imgor.heximage files - Ability to boost device CPU frequency during high baud uploads
- Kernel filename checks ensure the image being uploaded matches the device
- Strong packet encoding with crc-32 and all packets acknowledged by device for rebustness
- Stateless device side bootloader for reliable recovery and restart
- Automatic idle time baud rate and CPU frequency reset (for recovery)
- Bootloader version checks ensures flashy script and bootloader image are compatible
- Configurable packet size and timeout for flexibility with different devices
- Host side .hex file parsing and re-chunking for packet size balancing and simpler device side implementation
- Self relocating bootloader kernel images
Version 3
Version 3 adds support for managing the files on the Pi's SD card via the serial port:
- Transfer files between host PC and the Pi
- Manage files on the SD card with Linux-like commands
- An interactive shell
- Chain booting
Flashy 3 also introduces:
- a new command based structure for command line arguments and options (note this is not 100% backwards compatible with the command line args used in v2).
- loading default command line arguments from a file (saves typing serial port settings everytime)
Quick Guide
-
Install it:
> npm install -g @toptensoftware/flashy -
Copy the bootloader kernel images to the Raspberry Pi SD card
> flashy bootloader path_to_your_sd_card -
Connect the Pi's serial port to you PC
-
Use it!
> flashy /dev/ttyUSB0 kernel.img
Installation
Install Flashy
Flashy is written in JavaScript and requires NodeJS to be installed. Assuming node and npm are installed, install Flashy as follows:
# Windows
npm install -g @toptensoftware/flashy
# Linux
sudo npm install -g @toptensoftware/flashy
Copy Bootloader
Next you need to copy the bootloader kernel image files along with the other files require to boot
(see here) to the SD card of your Pi. The bootloader kernel images are included with Flashy and can be extracted using the bootloader sub-command:
eg: To place a copy of the kernel images in the root of drive D:
flashy bootloader D:\
Note: the bootloader command will overwrite existing files and only includes the
kernel image files - you still need to setup the rest of the boot partition yourself,
including config.txt.
Alternatively you can use the --print option to get the path to the packaged bootloader
images and run your own commands to deploy them:
cp --no-clobber `flashy bootloader --print`/*.img /mnt/sdcard
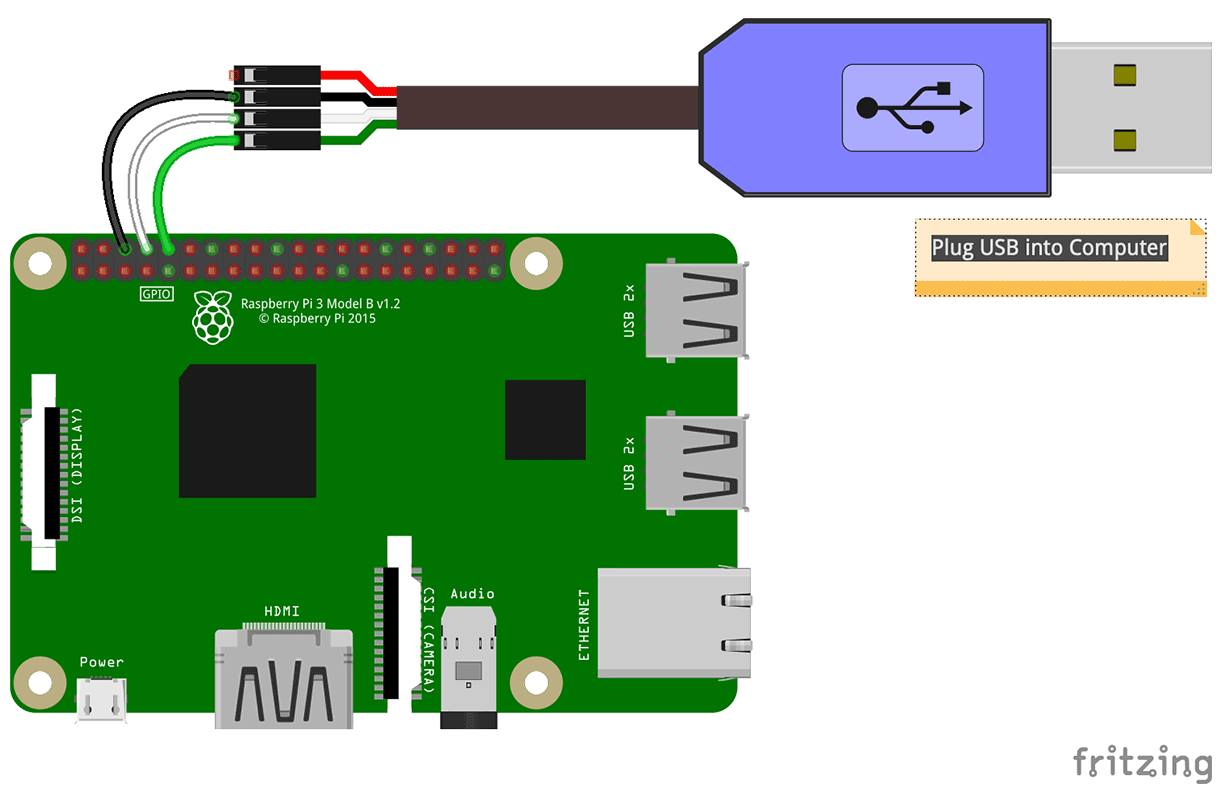
Connect Serial Port
Next, you need to connect the Pi's serial port to your PC - see here.
Boot and Test
Finally, boot the device from the SD card and confirm it's running by looking for a heart beat pattern on the activity LED. You can also confirm the serial connection with the status
sub-command:
$>flashy /dev/ttyUSB0 status
Found device:
    - Raspberry Pi 3 Model B+
    - Serial: 00000000-bc1b1209
    - CPU Clock: 600MHz (range: 600-1400MHz)
    - Bootloader: rpi2-aarch32 v2.0.13, max packet size: 4096
Command Line Utility
Sub-Commands
The flashy command line utility uses a concept of "sub-commands":
flashy [common-options] sub-command [sub-command-options] [additional-commands]
Options specified before the first sub-command are common to all sub-commands (unless overridden by a subsequent command line option)
For example the following executes three commands reboot, flash and monitor all
using the same serial port of /dev/ttyUSB0
flashy /dev/ttyUSB0  reboot "my_magic"   flash kernel7.img   monitor
       ---common---  -------cmd1-------  -------cmd2-------  --cmd3--
If no sub-command is specified, the default sub-command is flash (for limited backwards
compatibility with earlier versions).
eg:
flashy /dev/ttyUSB0 kernel7.img
Normally commands can just be listed one after the other, but for commands that
expect a variable number of positional arguments you can explicitly mark the end
of the command with --
eg: use -- to mark the end of the list of files to push and the start of a new command
flashy /dev/ttyUSB0 push cmdline.txt config.txt -- exec "reboot"
Command Line Defaults
To save specifying the same serial port options everytime Flashy is invoked, you can
save a set of defaults to the file ~/.flashy.json (where ~ is your home directory).
The file is a JSON file with options names matching the command line options converted to camelCase:
eg:
{
    "port": "/dev/ttyUSB0",
    "userBaud": 115200,
    "baud": 1500000
}
is equivalent to:
flashy /dev/ttyUSB0 --user-baud:115200 --baud:1500000 [ other commands/options ]
and lets you now type commands without those options explicitly specified:
flashy status
Uploading Images
Upload an image to the device by specifying the port and image name
(either .hex or .img file):
flashy /dev/ttyUSB0 kernel7.hex
Flash Baud Rate
Flashy initially connects to the device at 115200 baud. Once a connection has been established a command is sent to the device to change to a faster baud rate for file transfers.
The transfer baud rate is controlled by the --baud:NNN option and defaults to 1M baud.
Most devices can handle faster rates (typically 2M) but the default is 1M to give some margin for reliability. Feel free to experiment with this setting to get faster uploads.
Delayed Starts
Sometimes you'll need time between uploading a program image and the program starting. There are two ways to do this:
- Use
--go-delay:NNNwhere NNN is the number of milliseconds to stall after the upload before starting the program - Use
--no-goto upload the kernel image without starting it. To later manually start the program, use thegosub-command.
The --go-delay is particularly handy for giving time to start a serial monitor program so the start of the program's debug log isn't missed.
eg: flash image and start with 5 second delay:
flashy /dev/ttyUSB0 kernel7.hex --go-delay:5000
eg: flash image without starting
flashy /dev/ttyUSB0 kernel7.hex --no-go
and then manually start it:
flashy /dev/ttyUSB0 go
Magic Reboots
Flashy can send a "magic" reboot string.
For this to work the currently running image (ie: your program) must be monitoring the serial port for the supplied string and be configured to reboot when detected.
If your project uses Circle, use the CSerialDevice::RegisterMagicReceivedHandler
method to set this up.
Send reboot strings with the reboot <magic> command:
flashy /dev/ttyUSB0 reboot myMagicString
By default reboot strings are sent at 115200 baud. Use the --user-baud:NNN option to
change this.
You can combine reboot strings with sending an image:
flashy /dev/ttyUSB0 reboot myMagicString flash kernel7.hex
For backwards compatibility the default flash sub-command also supports sending magic reboot
strings with the --reboot:<magic> option:
flashy kernel7.hex --reboot:myMagicString
Magic Reboot vs Shell Reboot
Flashy includes two different reboot commands that perform slightly different actions:
-
flashy reboot <magic>- sends a magic reboot string that the currently running image (ie: your program) should listen for and invoke a reboot. Typically used to get back to the flashy bootloader to upload a new image. -
flashy exec "reboot"- executes the shell reboot command that tells the flashy image to reboot the device (see shell commands below). Typically used to reboot after replacing installed kernel images or updates to config.txt or cmdline.txt.
ie: the first version is used to reboot when your image is running, the second when the Flashy bootloader is running.
Monitoring
Flashy includes a simple serial port monitor that can show any text output by the device.
Monitoring is done at the --user-baud:NNN baud rate (by default 115200).
Start the this with the monitor sub-command or the --monitor option to the flash sub-command.
eg: Reboot the device, then send kernel7.hex, then monitor serial port output:
flashy /dev/ttyUSB0 reboot myMagicString flash kernel7.hex monitor
or:
flashy /dev/ttyUSB0 kernel7.hex --reboot:myMagicString --monitor
Bootloader Images
The bootloader images are the Flashy kernel images that need to be installed on the target device for Flashy to communicate with.
The Flashy package includes pre-built bootloader images and the bootloader sub-command
can be used to work with them.
To extract the bootloader images to the current directory:
flashy bootloader
To extract the bootloader images to a specified directory:
flashy bootloader /some/directory/path
To print the path to the packaged bootloader images:
flashy bootloader --print
Also, the push and flash sub-commands have an option --bootloader that can be
used to push/flash the latest bootloader images to a device.
eg:
flashy /dev/ttyUSB0 exec "mkdir -p /sd/flashy3/"
flashy /dev/ttyUSB0 push --bootloader --to:/sd/flashy3/
To update a device that's running an earlier build of Flashy v3 you can use this command:
flashy /dev/ttyUSB0 push --bootloader --no-version-check -- reboot
To update a device that's running Flashy v2, you can do this:
# Flash the current Flashy bootloader image (to memory)
flashy /dev/ttyUSB0 flash --bootloader --no-version check

# Now push the bootloader kernel images to the SD card and reboot
flashy /dev/ttyUSB0 push --bootloader -- reboot
Activity LED
On devices that have an activity LED, the bootloader provides the following feedback:
- When idle and ready the LED flashes in a heartbeat pattern (2 flashes in quick succession every 1 second).
- When idle but armed for automatic chain boot, the LED flashes in a double speed heartbeat pattern (2 flashes in quick succession every 1/2 second).
- When receiving data, the activity LED toggles on receipt of every packet (ie: it flashes rapidly, flickers, or appears dim depending on baud rate and packet size)
- Otherwise the LED is off.
When the indicator is off, this indicates either the bootloader isn't running, or is still in in a non-default (ie: high) baud rate mode after a failed or cancelled flash operation.
Normally, half a second after a failed flash the bootloader will revert to the default baud rate and the heart beat indicator will re-appear.
Working with SD Card Files
Flashy v3 introduces the ability to work with files on the Pi's SD card.
The file system is configured to use Linux-like file paths and the SD card is
"mounted" in the sub-directory /sd. DOS/Windows style drive letters are not supported.
The file commands prefer forward slashes / for directory separators, but also accept
backslashes \.
Most commands that work with files accept a command line option to set the remote
working directory --rwd:/sd/mysubdir. Remote file names will be resolved relative
to this path. If not specified the default remote working directory is /sd.
File and directory names are case-insensitive.
Only the first partition is supported.
Transferring Files
The pull and push commands can be used to transfer files to/from the SD card of the device:
eg: retrieve the file log.txt from the device:
flashy /dev/ttyUSB0 pull log.txt
eg: send the file cmdline.txt to the device:
flashy /dev/ttyUSB0 push cmdline.txt
The push and pull commands both accept wildcard characters. The pull command
also accepts brace expansion (eg: /sd/images/*.{png,jpg}).
Both commands can accept multiple files:
flashy /dev/ttyUSB0 pull log.txt debug-log.txt output.data
To specify the target location/name for a transfer, use the --to option:
flashy /dev/ttyUSB0 pull log.txt --to:./logs/
Working with Wildcards
When passing file names to the Flashy command line utility care needs to be taken to escape names that should be resolved on the device and not on the host.
Since most Linux style shells (eg: bash) expand command line arguments before passing them to the program, you'll need to escape device side file names to prevent the shell from trying to resolve them against the host file system.
eg: this command may not do what you intend since the shell will try to expand *.png
to match files in the current directory.
flashy /dev/ttyUSB0 pull *.png
instead, use this:
flashy /dev/ttyUSB0 pull "*.png"
Shell Commands
Flashy v3 supports a simple set of Linux like shell commands for working with files on the SD card.
Use the exec sub-command to invoke a shell command:
eg: list files on the SD card
flashy /dev/ttyUSB0 exec "ls -al"
Note the command to be invoked must be quoted (or escaped) so the whole command is passed to Flashy as a single command line argument.
Commands that expect path names will also accept wildcards (* and ?) and simple brace
expansions ({png,jpg}).
Multiple commands can be specified using the &&, || and ; operators:
flashy /dev/ttyUSB0 exec "cd temp && rm -rf *"
Redirection and piping is not supported.
The following commands are supported:
cat <files>chain <imageFileOrDirectory>cd <directory>cp <paths> <target> [-r|--recursive] [-n|--no-clobber]dateecho <text> [-n] [-o|--out:<file>] [-a|--append]exitfalsehexdump <files> [-s|--skip:<offset>] [-n|--length:<bytes>]label <mountpoint> [<newlabel>]ls <paths> [-a|--all] [-l]]mkdir <paths> [-p|--parents]mv <paths> <target> [-n|--no-clobber]pwdrebootrm <paths> [-r|--recursive] [-f|--force]rmdir <paths>-
sleep <period>(with suffixesms,s,m,h,d, fractions supported) touch <files>true
Interactive Shell
In addition to running shell commands via the command line you can also open an interactive shell:
> flashy /dev/ttyUSB0 shell
You'll be presented with a prompt showing the connected Pi model, current
architecure (eg: aarch32), the label of the first partition on the SD card
(eg: DEV) and the current remote working directory (eg: /sd)
Raspberry Pi 3 Model B+ (aarch32) (DEV) /sd>
You can then enter any of the shell commands shown above:
Raspberry Pi 3 Model B+ (aarch32) (DEV) /sd> ls -l kern*
----a 18/07/2023 20:57:18         8192 kernel.img
----a 18/07/2023 20:57:18         8192 kernel7.img
----a 18/07/2023 20:57:18         8192 kernel7l.img
----a 18/07/2023 20:57:18         8272 kernel8-rpi4.img
----a 18/07/2023 20:57:18         8272 kernel8.img
Chain Booting
Chain booting refers to loading and running a kernel image from the SD card. eg: chain booting from Flashy to Linux.
Manual Chain Booting
A chain boot can be invoked manually using the chain shell comamnd:
flashy /dev/ttyUSB0 exec "chain someKernelImage.img"
You can also automatically load an image appropriate for the current device model/architecture using a wildcard character which will be replaced with the appropriate suffix:
eg: chain kernel*.img will load an image appropriate to the device:
- Pi 1 - kernel.img
- Pi 2 - kernel7.img
- Pi 3 (aarch32) - kernel8-32.img or if not found, kernel7.img
- Pi 3 (aarch64) - kernel8.img
- Pi 4 (aarch32) - kernel7l.img
- Pi 4 (aarch64) - kernel8-rpi4.img
You can also use the chain command with a directory.
eg: /sd/myApp/ is equivalent to /sd/myApp/kernel*.img:
flashy /dev/ttyUSB0 exec "chain /sd/myApp/"
Automatic Chain Booting
Automatic chain booting lets you chain boot from Flashy's bootloader into another kernel if no serial port activity is detected within a period of time after boot.
Automatic chain booting is configured in the standard Pi cmdline.txt file using
the flashy.autochain option.
For example adding this option to cmdline.txt (and assuming Flashy is installed
as the default boot kernel on the device) would cause Flashy to load and wait 10
seconds before passing control to someKernelImage.img.
flashy.autochain=10,/sd/someKernelImage.img
The value comprises two parts separated by a comma:
- The number of seconds to delay (or use unit suffixes the same as the
sleepshell command) - The image to load. Supports the same wildcard/directory as the
chaincommand but the path must be fully qualified including the/sdprefix
If flashy receives any serial port packets before the timeout elapses, it will disable auto chain and enter its normal idle state.
By combining auto chain booting and magic reboot strings you can have the device automatically boot into a custom image, but be able to intercept the boot with Flashy when needed.
For example this command will reboot your running image by sending a magic reboot string and then open a flashy command shell (which will also prevent the auto-chain boot from happening).
flashy /dev/ttyUSB0 reboot myMagicString shell
You could also do something like this which will reboot the device, push a new kernel image and reboot the device again (to load the new kernel)
flashy /dev/ttyUSB0 reboot myMagicString push kernel7.img -- exec "reboot"
or chain directly to the pushed image:
flashy /dev/ttyUSB0 reboot myMagicString push kernel7.img -- exec "chain kernel7.img"
or push all images and chain to the appropriate one:
flashy /dev/ttyUSB0 reboot myMagicString push kernel*.img -- exec "chain ."
Miscellanous
CPU Boost
At upload rates over 1M baud the device's CPU frequency is boosted to the maximum rate for the period of the upload. This helps the device keep up with the data rate and often prevents a failed upload.
CPU boost can be overridden with the --cpu-boost command line option:
-
--cpu-boost:no- disable CPU boost even for > 1M baud uploads -
--cpu-boost:yes- boost CPU even for < 1M baud uploads -
--cpu-boost:auto- the default boost of > 1M baud upload.
Note: since the bootloader runs before the MMU or caches are enabled, the device doesn't run as fast as usual. Boosting the CPU frequency is an easily reversible change that lets faster baud rates work. Enabling the MMU and caches is not desirable in this situation because it would leave the machine in a different operating environment to a normal "non-flashed" boot.
Sanity Checks
Flashy performs a number of sanity checks to ensure correct behaviour and help prevent silly mistakes:
-
Flashy ensures its own version number matches the bootloader version on the device. You can skip this check with the
--no-version-checkcommand line option. You still get the warning but often the upload will still succeed. -
Flashy checks the image you've selected to upload matches the device and target architecture (aarch32 vs 64) you're uploading it to. For example trying to upload an image named
kernel8.hexto a Raspberry Pi 4 (which expectskernel8-rpi4) will display an error and abort. You can skip this check with the--no-kernel-checkoption, or by renaming the kernel image file to not contain the stringkernel.
Packet Size
All communications between Flashy and the bootloader is done using binary data packets. Most of these packets are quite small except when uploading image data in which case they're 4K (by default).
This default was chosen as it gives a good balance between performance, reliability and overhead.
If you're having reliability issues you can try reducing either the --baud:NNN setting or you
can try using a smaller packet size with the --packet-size:NNN option.
Stress Testing
Flashy includes a --stress:N option that simulates a large upload by sneding each data packet
N times.
This can be handy for checking throughput rates, reliability, recoverability etc...
Running under WSL-2
WSL2 is a great development environment for bare metal Raspberry Pi projects however its lack of support for USB serial ports makes it difficult to flash a connected device.
There's a couple of solutions for this:
- Use USBIPD as described here, or
- Install Flashy on both the Windows host and the WSL2 operating system and let it find itself.
When flashy is launched in a WSL-2 environment with a /dev/ttyS* serial port name it will
attempt to relaunch itself as a Windows process where it has access to the COM ports.
For this to work, Flashy needs to be installed as an npm global tool on both the Windows host machine and the WSL guest operating system.
ie:
- on Windows run:
npm install -g @toptensoftware/flashy - and on WSL/Linux run:
sudo npm install -g @toptensoftware/flashy
Once installed in both environments, Flashy will detect when you're using a serial port, find itself in Windows and relaunch itself automatically.
Currently there are no version checks between the two platforms - always make sure you've got the same version of Flashy installed on both Windows and the WSL machine.
Self Relocating Bootloader Kernel Images
Previous versions of the bootloader kernel images included a 2Mb buffer to reserve room for the uploaded (aka flashed) image. The made the kernel images unnecessarily large (over 2Mb each), slower to load and limited flashed images to 2M.
Flashy v2 has self relocating kernel images that are much smaller. They load quickly and allow for flashed images up to about 120Mb - which should be more than enough for even the largest projects.
This also means Flashy can be used to flash itself :)
Supported Devices
While Flashy should work on all Raspberry Pi models it's been tested on and confirmed to work with the following devices/architectures:
- Raspberry Pi Zero W
- Raspberry Pi 1 Model B R2
- Raspberry Pi 2 Model B
- Raspberry Pi 3 Model B+ (AARCH32/kernel7)
- Raspberry Pi 3 Model B+ (AARCH64)
- Raspberry Pi 4 Model B (AARCH32)
- Raspberry Pi 4 Model B (AARCH64)
All devices were tested at flash baud of 2M except the Pi 2 which required a slower rate of 1.5M baud. (the default flash rate is 1M).
License
Apache 2.0. See LICENSE file.