
react-native-membrane-webrtc is a React Native wrapper for membrane-webrtc-android and membrane-webrtc-ios. It allows you to quickly and easily create a mobile client app in React Native for Membrane server.
API documentation is available here
Firstly install react-native-membrane with yarn or npm
yarn add @jellyfish-dev/react-native-membrane-webrtc
or
npm install --save @jellyfish-dev/react-native-membrane-webrtc
If you're using development builds with eas build or bare workflow you can try using expo plugin to do the configuration below for you.
Simply run:
expo install @jellyfish-dev/react-native-membrane-webrtc
Add plugin to your app.json if it's not already added:
{
  "expo": {
    "name": "example",
    ...
    "plugins": [
      "@jellyfish-dev/react-native-membrane-webrtc"
    ]
  }
}
If you want to use screensharing feature, enable it like this:
{
  "expo": {
    "name": "example",
    ...
    "plugins": [
      [
        "@jellyfish-dev/react-native-membrane-webrtc",
        {
          "setUpScreensharing": true,
        }
      ]
    ]
  }
}
On bare workflow run expo prebuild to configure the app, then run pod install.
On development build eas build should take care of it.
- Add camera and microphone permissions to your
AndroidManifest.xml. - Rebuild the app. That's it!
On iOS installation is a bit more complicated, because you need to setup a screen broadcast app extension for screensharing.
- Add camera and microphone permissions to your main
Info.plist.<key>NSCameraUsageDescription</key> <string>Allow $(PRODUCT_NAME) to use the camera</string> <key>NSMicrophoneUsageDescription</key> <string>Allow $(PRODUCT_NAME) to use the microphone</string>
- We recommend adding
audiobackground mode inInfo.plistso that the app doesn't disconnect when it's in background:
	<key>UIBackgroundModes</key>
  <array>
    <string>audio</string>
</array>-
Open your
<your-project>.xcworkspacein Xcode -
Create new Broadcast Upload Extension. Select File → New → Target... → Broadcast Upload Extension → Next. Choose the name for the new target, select Swift language and deselect "Include UI Extension".
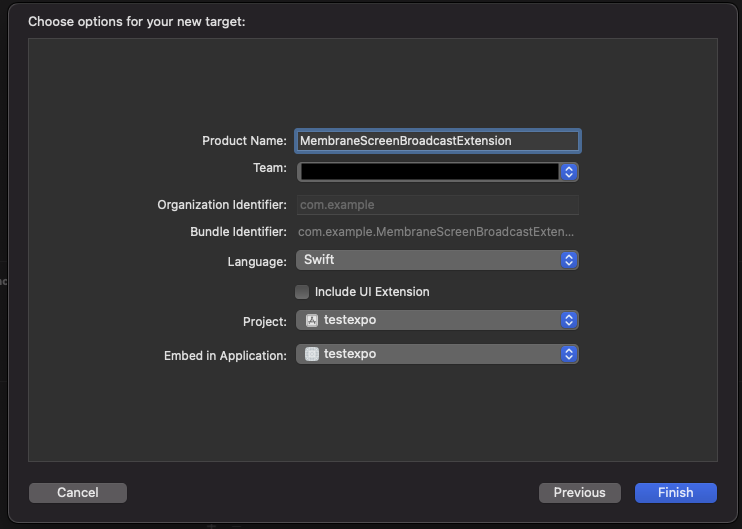
Press Finish. In the next alert xcode will ask you if you want to activate the new scheme - press Cancel.
-
Configure app group. Go to "Signing & Capabilities" tab, click "+ Capability" button in upper left corner and select "App Groups".
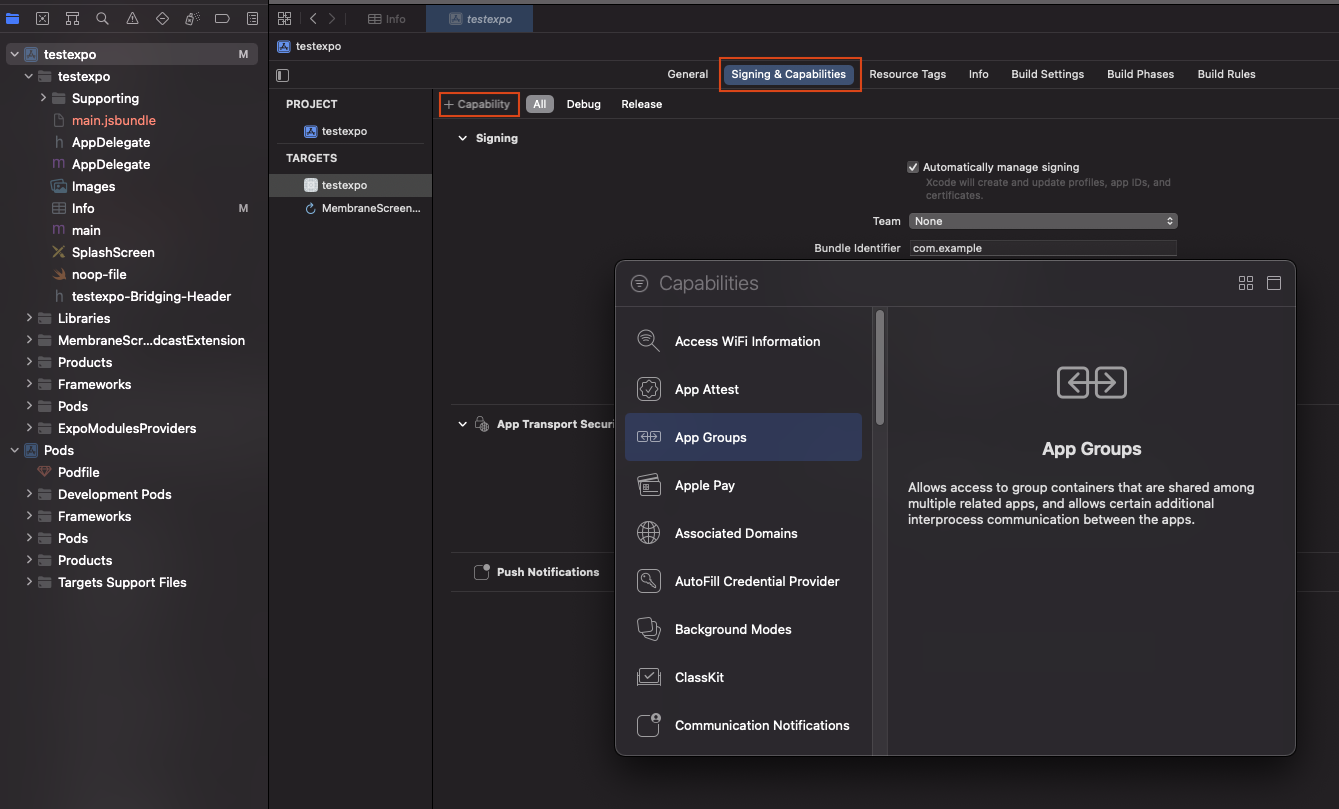
Then in the "App Groups" add a new group or select existing. Usually group name has format
group.<your-bundle-identifier>. Verify that both app and extension targets have app group and dev team set correctly. -
A new folder with app extension should appear on the left with contents like this:
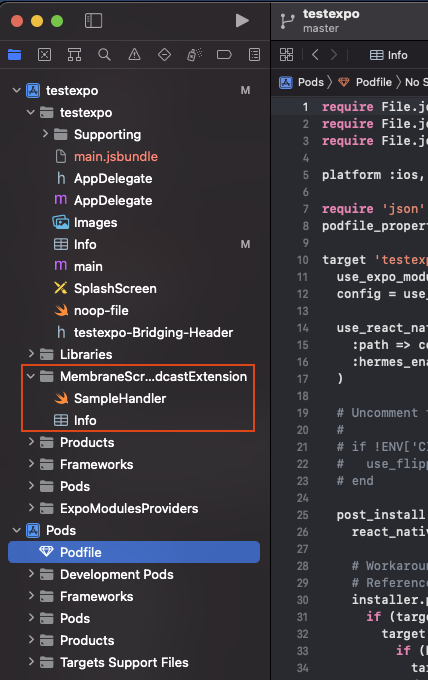
Replace
SampleHandler.swiftwithMembraneBroadcastSampleHandler.swiftand this code:import Foundation import MembraneRTC import os.log import ReplayKit import WebRTC /// App Group used by the extension to exchange buffers with the target application let appGroup = "{{GROUP_IDENTIFIER}}" let logger = OSLog(subsystem: "{{BUNDLE_IDENTIFIER}}.MembraneBroadcastSampleHandler", category: "Broadcaster") /// An example `SampleHandler` utilizing `BroadcastSampleSource` from `MembraneRTC` sending broadcast samples and necessary notification enabling device's screencast. class MembraneBroadcastSampleHandler: RPBroadcastSampleHandler { let broadcastSource = BroadcastSampleSource(appGroup: appGroup) var started: Bool = false override func broadcastStarted(withSetupInfo _: [String: NSObject]?) { started = broadcastSource.connect() guard started else { os_log("failed to connect with ipc server", log: logger, type: .debug) super.finishBroadcastWithError(NSError(domain: "", code: 0, userInfo: nil)) return } broadcastSource.started() } override func broadcastPaused() { broadcastSource.paused() } override func broadcastResumed() { broadcastSource.resumed() } override func broadcastFinished() { broadcastSource.finished() } override func processSampleBuffer(_ sampleBuffer: CMSampleBuffer, with sampleBufferType: RPSampleBufferType) { guard started else { return } broadcastSource.processFrame(sampleBuffer: sampleBuffer, ofType: sampleBufferType) } }
Replace
{{GROUP_IDENTIFIER}}and{{BUNDLE_IDENTIFIER}}with your group identifier and bundle identifier respectively. -
In project's Podfile add the following code:
target 'MembraneScreenBroadcastExtension' do
  pod 'MembraneRTC/Broadcast'
end
This new dependency should be added outside of your application target. Example
target 'ReactNativeMembraneExample' do
 ...
end

target 'MembraneScreenBroadcastExtension' do
 pod 'MembraneRTC/Broadcast'
end
-
Run
pod installin yourios/directory -
Add the following constants in your Info.plist:
<key>AppGroupName</key>
<string>{{GROUP_IDENTIFIER}}</string>
<key>ScreencastExtensionBundleId</key>
<string>{{BUNDLE_IDENTIFIER}}.MembraneBroadcastSampleHandler</string>
Replace
{{GROUP_IDENTIFIER}}and{{BUNDLE_IDENTIFIER}}with your group identifier and bundle identifier respectively. -
Rebuild the app and enjoy!


We strongly recommend checking out our example app that implements a basic video room client. To run the app:
- Go to Membrane's server demo repo: https://github.com/membraneframework/membrane_videoroom. Follow instructions there to setup and run demo server.
- Clone the repo
-
$ cd example $ yarn - In App.ts replace server url with your server's url.
-
yarn run androidoryarn run iosor run project from Android Studio / Xcode just like every RN project. Note that simulators won't work, you have to test on real device for camera and screensharing to run.
Important note!! Since version 7.4.0 call function initializeWebRTC() once in your app before using any other functionality.
Start with connecting to the membrane webrtc server. Use useWebRTC() hook to manage connection:
const { connect, disconnect, error } = useWebRTC();Connect to the server and join the room using the connect function. Use user metadata to pass things like usernames etc. to the server. You can also pass connection params that will be sent to the socket when establishing the connection tries.
const startServerConnection = () => {
  try {
    await connect('https://example.com', "Annie's room", {
      endpointMetadata: {
        displayName: 'Annie',
      },
      connectionParams: {
        token: 'TOKEN',
      },
    });
  } catch (e) {
    console.log('error!');
  }
};
Remember to gracefully disconnect from the server using the disconnect() function:
const stopServerConnection = () => {
  await disconnect();
};
Also handle errors properly, for example when internet connection fails or server is down:
useEffect(() => {
  if (error) console.log('error: ', e);
}, [error]);
Start the device's camera and microphone using useCamera() and useMicrophone() hooks. Use videoTrackMetadata and audioTrackMetadata options to send metadata about the tracks (for example whether it's a camera or screencast track).
const { startCamera } = useCamera();
const { startMicrophone } = useMicrophone();

await startCamera({
  quality: VideoQuality.HD_169,
  videoTrackMetadata: { active: true, type: 'camera' },
});
await startMicrophone({ audioTrackMetadata: { active: true, type: 'audio' } });
For more options and functions to control the camera and microphone see the API documentation.
If you have the connection set up, then use useEndpoints() hook to track the other endpoints in the room. One of the endpoints will be a local participant (the one who's using the device). When endpoints is added or removed because an user joins or leaves the room, the endpoints will be updated automatically. Simply call the hook like this:
const endpoints = useEndpoints();When you have the endpoints all that's left is to render their video tracks. Use <VideoRendererView /> component like this:
{
  endpoint.videoTracks.map((track) => (
    <VideoRendererView trackId={track.id} />
  ));
}
You can style the views to lay out them however you'd like, basic animations should work too.
There are also some simple hooks for toggling camera, microphone and screensharing. Use them like this:
const { isCameraOn, toggleCamera } = useCameraState();
const { isMicrophoneOn, toggleMicrophone } = useMicrophoneState();
For screencasting use useScreencast() hook. The local endpoint will have a new video track which you can render just like an ordinary video track with :
const { isScreencastOn, toggleScreencast } = useScreencast();
...
toggleScreencast({screencastMetadata: { displayName: "Annie's desktop" }});
Use track metadata to differentiate between video and screencast tracks.
Run ./scripts/init.sh in the main directory to install swift-format and set up git hooks.
To release a new version of the lib just run yarn release, follow the prompts to bump version, make tags, commits and upload to npm
To release a new version of the example app on Android install fastlane, get upload key password and firebase auth json from the devs, update ~/.gradle/gradle.properties like this:
MEMBRANE_UPLOAD_STORE_FILE=my-upload-key.keystore
MEMBRANE_UPLOAD_KEY_ALIAS=my-key-alias
MEMBRANE_UPLOAD_STORE_PASSWORD=********
MEMBRANE_UPLOAD_KEY_PASSWORD=********
and run yarn releaseAppAndroid from the main directory.
To release a new version of the example app on iOS install fastlane, get added to swmansion app store account and run yarn releaseAppIos from the main directory.
Pro tip: when developing set backend url in .env.development.
This project has been built and is maintained thanks to the support from dscout and Software Mansion.
![]()