This project aims to showcase skills in data engineering by gathering and analyzing job market data from various sources. By the end of the project, we aim to have a clearer understanding of the job market, including sectors with the highest demand, required skills, active cities, and more.

- WebScrapping: BeautifulSoup, Selenium, Adzuna API, Muse API
- Python: -3.10.x
- NoSQL: ElasticSearch
- Docker Compose: Docker v2.15.1
- API: fastAPI
-
Clone the repository: Clone this
Job-Market-projectrepository to your local machine using Git:git clone https://github.com/arunp77/Job-Market-Project.git
-
Navigate to the project directory: Change your current directory to Job-Market-project:
cd Job-Market-Project -
Set Up Virtual Environment (Optional): It's a good practice to work within a virtual environment to manage dependencies. In our case, we have created a Python virtual environment using
virtualenv(which can be installed throughpip install virtualenv) orconda:# Using virtualenv python -m venv env # activate the enviornment source env/bin/activate # in mac env\Scripts\activate # in windows using Command Prompt .\env\Scripts\Activate.ps1 # in windows using powershell # Using conda conda create --name myenv conda activate myenv
Deactivate the Virtual Environment: When you're done working on your project, you can deactivate the virtual environment to return to the global Python environment.
deactivate
-
Install Dependencies: Install the required Python packages specified in the requirements.txt file:
pip install -r requirements.txt
-
Access the databases on Elasticsearch: Please see below for more details (Go to Elasticsearch Integration). To run the elasticsearch, we must have
elasticsearchpython clinet installed. Next run the docker-compose.yml first using (detached mode)docker-compose up -d
and then run the
db_connection.pyfile to integration the elasticsearch usingpython db_connection.py
- So the Elasticsearch runs at port: http://localhost:9200/
- So the Kibana runs at port: http://localhost:5601/
Here it should be noted that
db_connection.pyscript is responsible for establishing a connection to Elasticsearch and loading data into it. -
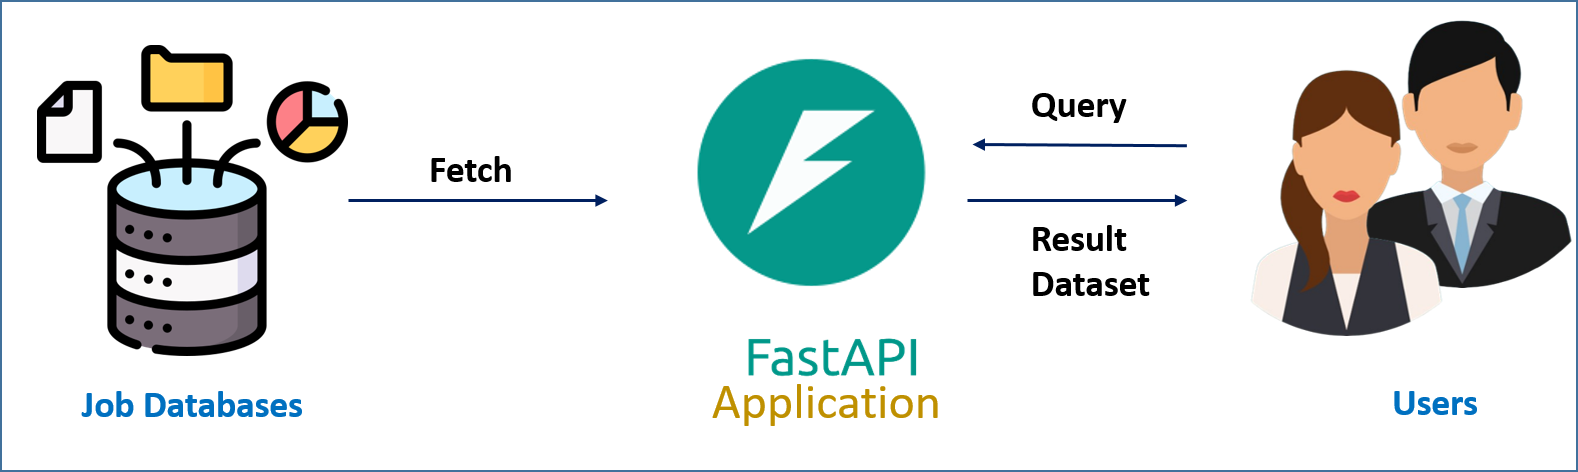
Deployment: FastAPI: Our FastAPI is created using the
api.pyscript available in the repository. In our case the FASTApi server runs at http://localhost:8000/ (for more details see FASTApi section below). To start the FastAPI server, we can use the following command:uvicorn api:api --host 0.0.0.0 --port 8000
or
uvicorn api:api --reload
enables automatic reloading of the server whenever the source code changes. For more details on each endpoint and how to interact with the API
-
docs_url: Specifies the URL path where the OpenAPI (Swagger UI) documentation will be available. By default, it's set to /docs and can be accessed at http://localhost:8000/api/docs -
redoc_url: Specifies the URL path where the ReDoc documentation will be available. By default, it's set to /redoc and can be accessed to http://localhost:8000/api/redoc.
-
-
Compile and Run the Project: Once your FastAPI application is running, we can access it in our browser by navigating to
http://localhost:8000(assuming we're running it locally).
Job-Market-project/
│
├── .env                                        # Environment variables file
├── .github/
│   └── workflows/                              # GitHub Actions workflow directory
│       └── ci.yml                              # CI/CD workflow file
├── images/                                     # Directory for image files
├── scripts/                                    # Directory for scripts
│   ├── web_scraping/                          # Directory for web scraping scripts
│   │   ├── adzuna.py                          # Script for adzuna data extraction
│   │   ├── muse.py                             # Script for Muse data extraction
│   │   └── ss.py                               # Script for Stepstone data extraction
│   ├── etl/                                    # Directory for ETL scripts
│   │   └── etlscript.py                        # ETL script
│   ├── database/                               # Directory for database scripts
│   │   └── db_connection.py                    # Database connection script
│   └── plot_analysis/                         # Directory for plot analysis scripts
│        └── uscase.py                          # Use case plot analysis script
├── data/                                      # Directory for data
│   ├── scraped_data/                          # Directory for scraped data
│   │   ├── adzuna/                           # Directory for adzuna data
│   │   │   └── csv/                           # Directory for CSV files
│   │   │       └── adzuna_scrapped_data.csv   # adzuna scraped data file
│   │   ├── muse/                              # Directory for Muse data
│   │   │   └── csv/                           # Directory for CSV files
│   │   │       └── muse_scrapped_data.csv     # Muse scraped data file
│   │   └── ss/                                # Directory for Stepstone data
│   │       └── ss_datascience_germany_20240221.csv # Stepstone data file
│   └── processed_data/                        # Directory for processed data
│       ├── adzuna_processed_data/            # Directory for processed adzuna data
│       │   └── adzuna_scrapped_data.csv       # Processed adzuna data file
│       ├── muse_processed_data/               # Directory for processed Muse data
│       │   └── muse_scrapped_data.csv         # Processed Muse data file
│       └── ss_processed_data/                 # Directory for processed Stepstone data
│           └── ss_datascience_germany_20240221.csv # Processed Stepstone data file
├── api.py                                     # FASTApi
├── README.md                                  # Readme file
├── ProjectPlan.md                             # Project plan file
├── LICENSE.md                                 # License file
├── Contribution-guidelines.md                 # Contribution guidelines file
└── UserStories.md                             # User stories file
For more details, how we planned data extraction via APIs, please have a look at: data-extraction-api
In this project, we utilize Elasticsearch as our primary database solution for efficient storage, retrieval, and analysis of structured and unstructured data. Elasticsearch is a distributed, RESTful search and analytics engine designed for horizontal scalability, real-time search, and robust analytics capabilities. Elasticsearch proves invaluable in situations requiring full-text search, real-time indexing, scalability, and advanced analytics capabilities. Here python is utilized for seamless interaction with Elasticsearch by leveraging the elasticsearch Python client library. We can install the elasticsearch module using the following command in your terminal or command prompt:
pip install elasticsearch- The
db_connection.pyscript demonstrates how Python code can be written to establish connections to Elasticsearch, perform data operations, and integrate Elasticsearch functionality into our project workflow effectively. - Docker plays a crucial role in our project by facilitating the containerization of Elasticsearch and simplifying the management of deployment environments.
- The docker-compose.yml file defines the Docker services required for running Elasticsearch and Kibana within isolated containers.
- Docker Images used for the Elasticsearch: Elasticsearch
- Docker Images used for the Kibana: Kibana
- Docker Compose orchestrates the deployment of these services, ensuring consistent and reproducible environments across different development and deployment stages. By containerizing Elasticsearch, we achieve greater portability, scalability, and ease of deployment, making it convenient to deploy our Elasticsearch infrastructure in various environments with minimal configuration.
-
For more details on the, please check FASTApi.md file.
-
The first step is to install the
fastapianduvicornlibraries.uvicornis a library that allows us to launch the server created by FastAPI. -
We need an Asynchronous Server Gateway Interface (ASGI server), for production such as Uvicorn or Hypercorn, but we choose uvicorn to deploy on a local machine.
-
To install
fastapianduvicornlibraries:pip install fastapi uvicorn

Currently working on adding security features like provinind access rights, keeping log of Username and password in Mongodb database and many more....
We also maintain a Docker image for our project, available on Docker Hub at arunp77/job_market, ensuring accessibility and easy deployment. For more details, in what way we planned our project Docker image, please see docker-image integration.
This project is a group effort and would not have been possible without the help of these contributors:
- Arun Kumar Pandey: Email to Arun
- Brindha Sadayappan: Email to Brindha
- Khushboo Goyal: Email to Khusboo
- Cohort: Vincent
Feedback and contributions are welcome! Please open an issue or create a pull request if you have any suggestions or improvements. Contribution guidelines
This project is licensed under the GNU General Public License v3.0.
Check out this video I uploaded to YouTube. In this video, I have shown a step-by-step demo for the project: