
ioBroker.nello
nello one connects your intercom with your smartphone and Wi-Fi. This adapter connects your nello one to ioBroker using the official API (https://nellopublicapi.docs.apiary.io/).
Developers may find the javascript implementation of the nello.io API via https://github.com/Zefau/nello.io.


German Readme / Deutsche Anleitung
Table of contents
- Setup instructions (Quick Setup)
- Setup instructions (Advanced Setup)
- Usage / Actions
- Smart Home / Alexa integration using ioBroker.javascript
- Credits
- Changelog
- Licence
Setup instructions
Quick Setup
The nello auth API is responsible for authentication of all nello client apps. This service follows OAuth2 as an authentication scheme to authenticate an app/user. For further information about the OAuth2 standard, please check here: https://oauth.net/2/. To use this service, client credentials must be obtained from the nello auth admin UI located at: https://auth.nello.io/admin. Please not that for the time being you can only get one pair of client_id and client_secret. They consist of a client_id and a client_secret.
- Generate Client ID and Client Secret on https://auth.nello.io/admin
- In the ioBroker.nello adapter settings, fill in both Client ID / Client Secret
- Press the button "Get Token" to generate a token
- Save and enjoy the adapter
This quick setup will retrieve your locations (all available doors) from the nello API including the respective address. Furthermore, the assigned time windows of the locations will be retrieved. Additionally, you may open the door with this basic setup. To receive events (door bell rings), you have to follow the advanced setup.
Log
If you successfully quick-setup ioBroker.nello, you will find the following in the ioBroker Log:
nello.0	2018-11-24 21:29:48.132	info	Updating time windows of location XXXXX.
nello.0	2018-11-24 21:29:47.905	info	Updating location: {"location_id":"XXXXXXXX-XXXX-XXXX-XXXX-XXXXXXXXXXXX","address":{"number":"X","country":"XXXXX","street":"XXXXX ","zip":"XXXXX","city":"XXXXX","state":""}}
nello.0	2018-11-24 21:29:47.342	info	starting. Version X.X.X in /opt/iobroker/node_modules/iobroker.nello, node: vX.XX.X
States
If you successfully quick-setup ioBroker.nello, you will find yours doors as devices within "nello.0.". The format of a door is xxxxxxxx-xxxx-xxxx-xxxx-xxxxxxxxxxxx. Within each device, the following channels and states are created:
| Channel | State | Description |
|---|---|---|
| address | - | Address data of the location |
| address | address | Full address of the location |
| address | city | City of the location |
| address | country | Country of the location |
| address | state | State of the location |
| address | street | Street with number of the location |
| address | streetName | Street name of the location |
| address | streetNumber | Street number of the location |
| address | zip | ZIP code of the location |
| timeWindows | - | Time Windows of the location |
| timeWindows | indexedTimeWindows | Index of all time windows |
| timeWindows | deleteAllTimeWindows | Deletion of all time windows |
| timeWindows | createTimeWindow* | JSON object for creating a new timewindow (Documentation) |
| timeWindows.0000000000000000000 | - | Time Window: Description of the time window |
| timeWindows.0000000000000000000 | enabled | State whether time window is enabled |
| timeWindows.0000000000000000000 | icalObj | JSON object of the calendar data |
| timeWindows.0000000000000000000 | icalRaw | Text of the calendar data in iCal format |
| timeWindows.0000000000000000000 | id | ID of the time window |
| timeWindows.0000000000000000000 | image | (not in used) |
| timeWindows.0000000000000000000 | name | Name of the time window |
| timeWindows.0000000000000000000 | state | State |
| timeWindows.0000000000000000000 | deleteTimeWindow* | Delete this timewindow |
| - | _openDoor* | Open door of location XXXXX |
| - | id | ID of location XXXXX |
| - | refreshedDateTime | Last update (DateTime) of location XXXXX |
| - | refreshedTimestamp | Last update (Timestamp) of location XXXXX |
* highlighted states will trigger / perform an action when changed
Remark: You will only see those states if you have successfully quick-setup ioBroker.nello!
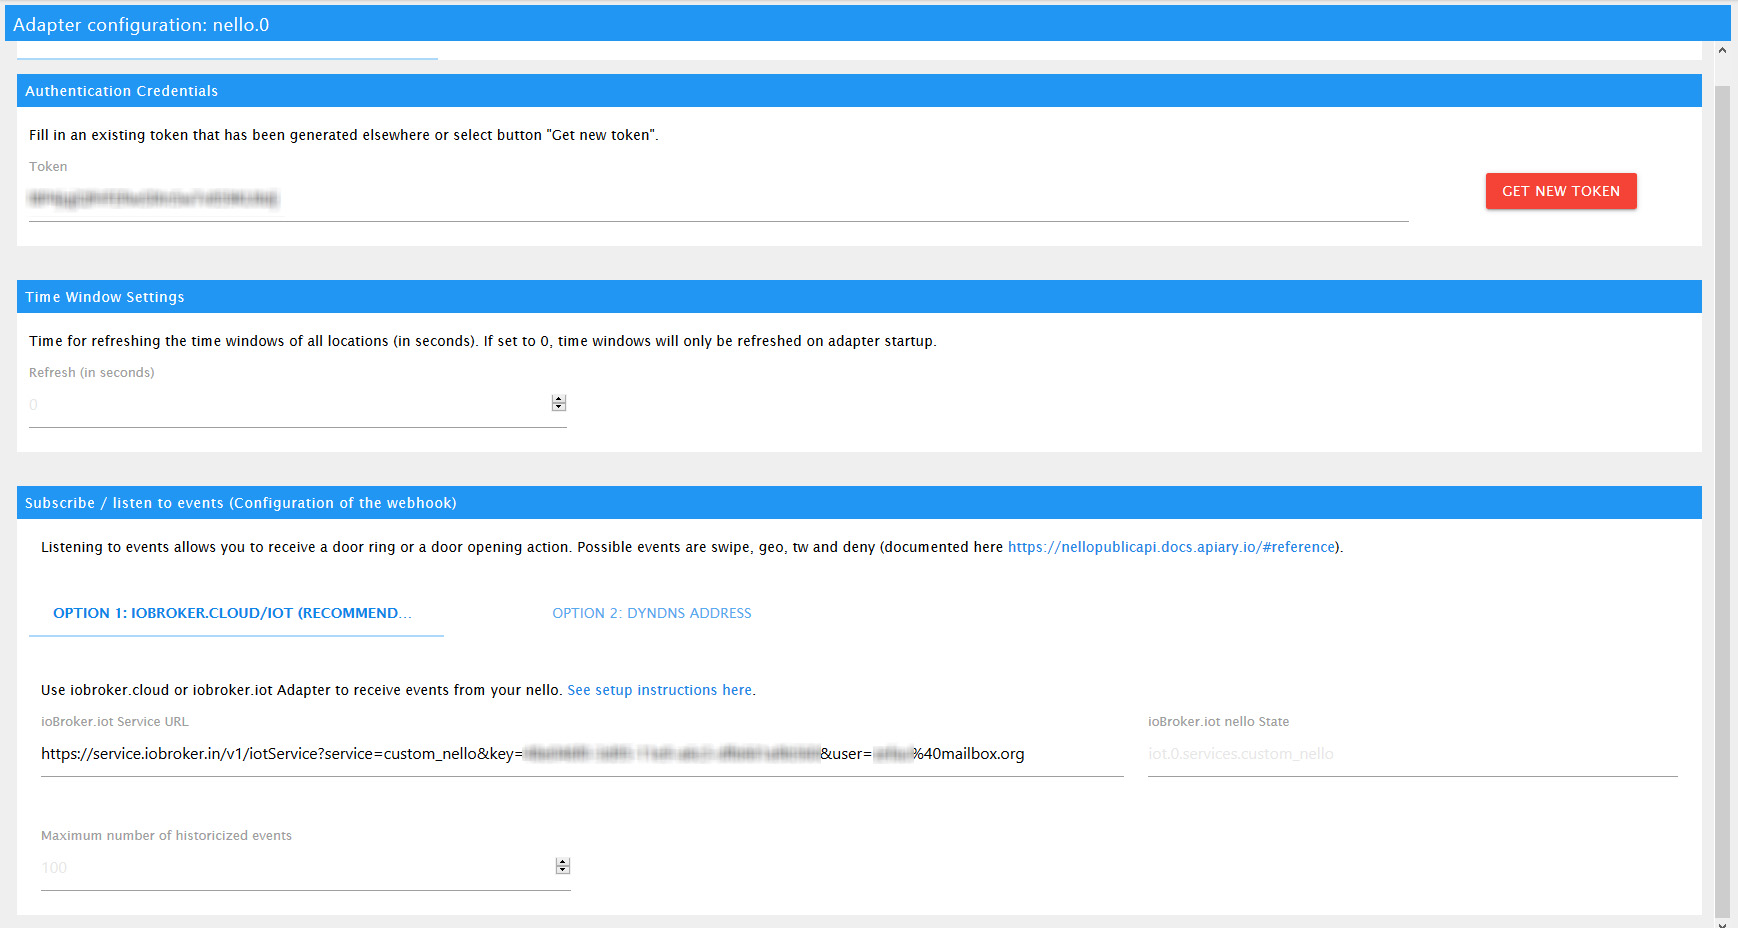
Advanced Setup
Option 1: ioBroker.cloud / ioBroker.iot Custom URL (recommended)
To receive events (door bell rings) it is recommended to use either ioBroker.cloud or ioBroker.iot adapter. The ioBroker.cloud / ioBroker.iot adpater will receive the event from nello and write it in a state, which is then readable by the ioBroker.nello adapter.
ioBroker.iot
- Go to the adapter settings of ioBroker.iot and navigate to the Services and IFTTT Tab.
- Add the term "nello" to the "White list for services" and copy the link for the custom services ("Use following link for custom service"), which looks like
https://service.iobroker.in/v1/iotService?service=custom_<SERVICE_NAME>&key=xxxxxxxx-xxxx-xxxx-xxxx-xxxxxxxxxxxx&user=email@domain.com&data=<SOME_TEXT>.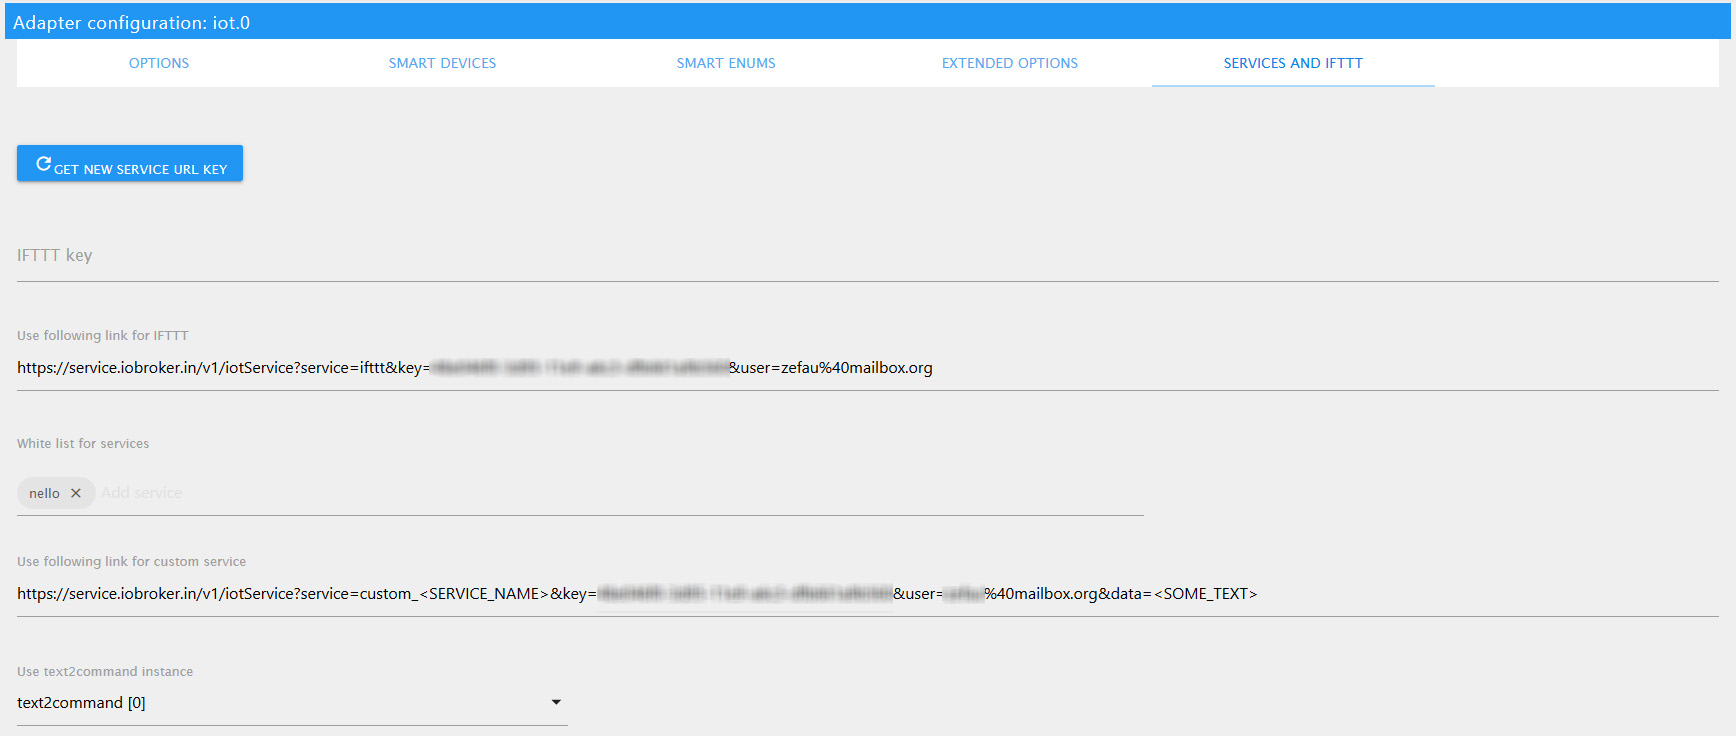
- Replace
custom_<SERVICE_NAME>with the service namecustom_nello(make sure that the term appended tocustom_matches the whitelisted word in step #2). Futhermore, remove&data=<SOME_TEXT>because it is not necessary. - Go to the nello adapter configuration and paste the link into "ioBroker.iot Service URL" (in Option 1).
- Save the nello Adapter settings and wait until the Adapter has (re)started. Then, ring at your door and verify the state has been created by ioBroker.iot. You will find the state called
custom_nellowithin the ioBroker objects viaiot.0.services.
- Once the state has been created successfully, restart the nello Adapter once more to be sure that the nello Adapter subscribes this newly created iot state
ioBroker.cloud
- Go to the adapter settings of ioBroker.cloud and navigate to the Services and IFTTT Tab.
- Add the term "nello" to the "White list for services" and copy the link for the custom services ("Use following link for custom service"), which looks like
https://iobroker.net/service/. - Add
custom_nello(make sure that the term appended tocustom_matches the whitelisted word in step #2). - Add your API key, so the URL eventually looks like
https://iobroker.net/service/custom_nello/xxxxxx. - Go to the nello adapter configuration and paste the link into "ioBroker.iot Service URL" (in Option 1).
- Save the nello Adapter settings and wait until the Adapter has (re)started. Then, ring at your door and verify the state has been created by ioBroker.cloud. You will find the state called
custom_nellowithin the ioBroker objects viacloud.0.services. - Once the state has been created successfully, restart the nello Adapter once more to be sure that the nello Adapter subscribes this newly created cloud state
Option 2: DynDNS URL
To receive events (door bell rings) you may alternatively provide an external URL (with port) in the ioBroker.nello adapter settings. This URL (incl. port) is sent to the nello API and registered. In case a door bell ring is registered by the API, the API will push this information to the provided URL. Please refer to https://en.wikipedia.org/wiki/Webhook for more information. If you no DynDNS address and no idea what the shit I'm talking about, please refer to https://www.howtogeek.com/66438/how-to-easily-access-your-home-network-from-anywhere-with-ddns/.
- Place the external DynDNS address including a port of your choice in the ioBroker.nello adapter settings
- Open the port of your choice in your router and route it to the ioBroker
- Done. You will now have additional states in your nello tree within the channel "events" and all events are written to a state named "feed".
Log
Independently of the option you chose, if you successfully advanced-setup ioBroker.nello, you will additionally find the following in the ioBroker Log:
nello.0 2018-11-24 21:29:48.220 info Listener attached to uri https://XXXX.XXXXX.XX:YYYY.
In case an event has been recognized by the webook listener, you will find any of those entries in the ioBroker Log:
nello.0 2018-11-24 21:38:48.322 info Received data from the webhook listener (action -deny-).
deny: When nello detects a bell ring, but neither a Time Window nor a Homezone Event caused the door to be opened.
nello.0 2018-11-24 21:38:48.322 info Received data from the webhook listener (action -swipe-).
swipe: When the door opens by an authorized user.
nello.0 2018-11-24 21:38:48.322 info Received data from the webhook listener (action -geo-).
geo: When the door is opened because of the Homezone Unlock feature (with a bell ring).
nello.0 2018-11-24 21:38:48.322 info Received data from the webhook listener (action -tw-).
tw: When the door is opened because of a Time indow (with a bell ring).
States
If you successfully advanced-setup ioBroker.nello, the following additional channels and states are created:
| Channel | State | Description |
|---|---|---|
| events | - | Events of the location |
| events | feed | Activity feed / Event history |
| events | refreshedDateTime | DateTime of the last event |
| events | refreshedTimestamp | Timestamp of the last event |
Remark: You will only see those states if you have successfully advanced-setup ioBroker.nello AND a first event as been recognized (someone rang on your)!
The "feed" state will provide a JSON of all events registered by the webhook. This will be an array of objects, where each object provides the following indizes (for details see https://nellopublicapi.docs.apiary.io/#reference/0/locations-collection/add-/-update-webhook):
- action: deny, swipe, tw or geo
- data:
- location_id
- timestamp
- user_id (only actions swipe, tw or geo)
- name (only actions swipe, tw or geo)
Usage / Actions
Open Door
To open the door of your nello, press the button of the state _openDoor.
Adding a new Time Window
For adding a new time window, paste the contents to the state timeWindows.createTimeWindow. The following format is expected:
{"name":"<NAME>","ical":"<iCal-String>"}
The format of the iCal-String can be found in the Nello API documentation (https://nellopublicapi.docs.apiary.io/#reference/0/locations-collection/create-a-new-time-window). It is important to separate the individual elements with \r\n.
Example of a timewindow:
{"name":"Cleaner","ical":"BEGIN:VCALENDAR\r\nBEGIN:VEVENT\r\nDTSTART:20190101T163000Z\r\nDTEND:20190101T170000Z\r\nSUMMARY:Cleaner\r\nEND:VEVENT\r\nEND:VCALENDAR"}
Deleting a Time Window
To delete a time window, press the button within the object tree of the respective time window.
Smart Home / Alexa integration using ioBroker.javascript
Some examples of a possible integration within your smart home.
Open door using Alexa
This requires the ioBroker adapter ioBroker.cloud (https://github.com/ioBroker/ioBroker.cloud).
Save the following function within a script in the "global" folder in the "Scripts" tab of ioBroker:
/** * Register node in Cloud Adapter * * @param * @param * @param * @param * @param * @return void */{ ; settings = typeof settings === 'string' ? type: settings : settings; ;}(updated on 2018-11-22 and fixed incorrect empty settings)
You can use this function for every state within ioBroker Object tree to register the state in the ioBroker.cloud adapter and use it within Alexa. IMPORTANT: Go into adapter settings of ioBroker.javascript and check the box "Enable command setObject"!
Now create a new script in the "common" folder using the function:
;Replace #YOUR DOOR ID# (also replace #) with the ID of the door you want to open. You find the ID in the ioBroker.nello state tree ("Objects" tab of ioBroker).
Eventually, search / discover new devices in your Alexa app and create a routine in the Alexa app (e.g. "Alexa, open door") and assign the newly discovered state to it. Finished! Now you may tell Alexa to open your door for you.
Let Alexa inform you about door ring
This requires the ioBroker adapter ioBroker.alexa2 (https://github.com/Apollon77/ioBroker.alexa2).
In order to use the voice output of Alexa we define a function say. Place the following function in a script in the "global" folder of ioBroker.javascript (you may place it in the same one as above). IMPORTANT: Replace #YOUR ALEXA ID# (also replace #) with your Alexa ID. You may find the Alexa ID in the Objects tree of ioBroker alexa2.0.Echo-Devices.
/** * Say something with Alexa. * * @param * @param * @return void * */ // use alexas = ['#YOUR ALEXA ID 1#', '#YOUR ALEXA ID 2#'] for default voice output from multiple devices (also replace #){ alexas = typeof alexas === 'string' ? alexas : alexas; alexas;}(updated on 2018-11-18 to support voice output from multiple alexa devices at a time)
You can use this function within ioBroker.javascript to say a phrase using Alexa say('Hello World') or say('Hello World', ['#YOUR ALEXA ID 1#', '#YOUR ALEXA ID 2#']) for voice output from multiple devices.
Create a script in the "common" folder of ioBroker.javascript (or use the one you created above) and add the following listener to it:
var L = 'actionRingUnknown': 'Es hat geklingelt' 'actionOpenName': '%name% hat die Tür geöffnet' 'actionOpenGeo': '%name% hat das Haus betreten' 'actionOpen': 'Die Haustür wurde geöffnet'; ;(updated on 2019-01-02 to also reflect geo option with specific Alexa phrase)
Based on the action of the event, Alexa will inform you about the door being opened or the door bell being recognized. IMPORTANT: Replace #YOUR DOOR ID# (also replace #) with your nello door ID.
Let colored lamps inform you about door ring
This functionality requires an adapter which can set colored / rgb lamps, e.g. ioBroker.hue (https://github.com/ioBroker/ioBroker.hue).
In order to use the colored lamps, the functions color und colors have to be defined. Place the following functions in a script in the "global" folder of ioBroker.javascript (you may place it in the same one as above):
/** * Visualize a message using a color / hue. * * @param * @param * @param * @param * @param * @param * @param * @param * @return void * */{ devices = typeof devices === 'string' ? devices : devices; devices;}/** * Append multiple messages using a delay to create a light sequence. * * @param * @param * @param * @param * @return * */{ var delayed = start; devices = typeof devices === 'string' ? devices : devices; devices; return delayed;}(updated on 2019-01-20 to fix issue #11)
You can use these functions within ioBroker.javascript to color any lamp, e.g. by color('hue.0.Philips_hue.Lamp', {'r': 0, 'g': 255, 'b': 0}) (color green) or color(['hue.0.Philips_hue.Lamp1', 'hue.0.Philips_hue.Lamp2'], {'r': 0, 'g': 255, 'b': 0}), to color multiple devices.
Create a script in the "common" folder of ioBroker.javascript (or use the one you created above) and add the following listener to it:
var lamp = '#YOUR LAMP#'; // e.g. hue.0.Philips_hue.Lampvar rgb = 'actionRingUnknown': 'r': 255 'g': 0 'b': 0 'bri': 255 'actionOpenName': 'r': 0 'g': 255 'b': 0 'bri': 255 'actionOpenGeo': 'r': 0 'g': 255 'b': 0 'bri': 255 'actionOpen': 'r': 0 'g': 255 'b': 0 'bri': 255 'reset': 'r': 255 'g': 255 'b': 255 'bri': 255; ;Based on the action of the event, the lamps will be colored with the defined values. IMPORTANT: Replace #YOUR LAMP# (also replace #) with the state of the lamp you would like to color. Replace #YOUR DOOR ID# (also replace #) with your nello door ID.
Credits
Icons made by Smashicons from www.flaticon.com is licensed by CC 3.0 BY
Changelog
2.0.7 (2019-08-10)
- (Zefau) Performance improvements
2.0.6 (2019-07-20)
- (Zefau) updated dependencies to fix security vulnerabilities in depending packages
2.0.5 (2019-05-15)
- (@Apollon77) updated testing for Node.js v12 (#25)
- (Zefau) updated dependencies
2.0.4 (2019-03-15)
- (@Apollon77) Core Files/Testing Update and introduce adapter-core (#17) and Update CI testing (#19)
2.0.3 (2019-03-03)
- (Zefau) added folder
.events.latestwith statesaction,twName,userIdanduserNamereflecting the information of the latest event
2.0.2 (2019-02-09)
- (Zefau) fixed error incorrectly stating a missing token
2.0.1 (2019-02-01)
- (Zefau) added error stack trace in log debug output
- (@ldittmar81) added support for gulp
2.0.0 (2019-01-27)
- (Zefau) added visual timeline of nello events
- (Zefau) support for ioBroker compact mode
- (Zefau) updated API dependency
1.x.x
For earlier release, please see Github branch for v1.
License
The MIT License (MIT)
Copyright (c) 2018-2019 Zefau zefau@mailbox.org
Permission is hereby granted, free of charge, to any person obtaining a copy of this software and associated documentation files (the "Software"), to deal in the Software without restriction, including without limitation the rights to use, copy, modify, merge, publish, distribute, sublicense, and/or sell copies of the Software, and to permit persons to whom the Software is furnished to do so, subject to the following conditions:
The above copyright notice and this permission notice shall be included in all copies or substantial portions of the Software.
THE SOFTWARE IS PROVIDED "AS IS", WITHOUT WARRANTY OF ANY KIND, EXPRESS OR IMPLIED, INCLUDING BUT NOT LIMITED TO THE WARRANTIES OF MERCHANTABILITY, FITNESS FOR A PARTICULAR PURPOSE AND NONINFRINGEMENT. IN NO EVENT SHALL THE AUTHORS OR COPYRIGHT HOLDERS BE LIABLE FOR ANY CLAIM, DAMAGES OR OTHER LIABILITY, WHETHER IN AN ACTION OF CONTRACT, TORT OR OTHERWISE, ARISING FROM, OUT OF OR IN CONNECTION WITH THE SOFTWARE OR THE USE OR OTHER DEALINGS IN THE SOFTWARE.